Introduction
Most of us developers have heard this word “load-balancer” in web development world. But have you ever wondered what exactly it is and how does one work. A load-balancer is a device/server that acts as a reverse-proxy and distributes the load on your web servers. Let’s see a typical diagram of a load-balancer.

The LB will be the entry point for your clients and then the LB will route your requests to the appropriate server(depending on many factors). Here all the servers are running the same application code. So let’s say one of you request endpoint is GET method with path as “/api/message” that means all the servers will be having this same request endpoint.
Basics and Terminologies
Before diving straight into the implementation lets understand some basics. Every LB has a routing strategy. Let’s understand first what that means.
A routing strategy is a strategy through which LB decides on which server
it has to forward an incoming client request.
Some of these strategies are mentioned below:
1. Round Robin: Every request will be forwarded to a non-dead server in a
circular/round robin fashion. For e.g. In our above diagram every /api/message request will be forwarded to each server in the following fashion . 1->2->3->1->2->3… (assuming all the servers are available). While implementation we will understand how to handle the case when some of the servers goes down.
2. Weighted Round Robin: Every server will have a weight ‘X’ associated with it. And higher the value of X the more no. of requests that server will process in a round robin fashion. For e.g. in our above diagram let’s say weights are (server1:1, server2: 2, server3: 1). Then this means that server2 will process double the requests of that server1 and server3 will process. Like
1->2->2->3->1->2->2->3. This is useful when one of your server is having more ram and cores then your other servers then it makes sense to let this server process more requests, thus utilising resources effectively.
There are many more techniques that a LB can use like weighted least connection, weighted response time etc. But those are beyond the scope of this article. I will be using the simplest of these strategies i.e. Round Robin strategy to illustrate the functioning of LB. I will be using Golang for implementing of our very simple load-balancer.
But the idea will be same regardless of which language you choose.
I will be using gin-gonic library for ease of implementation and the endpoint registration.

Okay Let’s now dive directly into the code. Let’s first define some structures
that we will be using.

Here Server is representation of your backend servers it contains the URL for your remote server, IsDead indicates whether your server is up or not. we will come to the lock part later and ReverseProxy is an HTTP Handler that takes an incoming request and sends it to another server, proxying the response back to the client.
Next we created a serverPool that will contain information for all the available servers, their total count and the LastServerUsed is used to tell which was the most recent server that processed the request.
Now Let’s look at some of the core functions we will be using.

Here GetNextAvailableServer() is used to fetch the server index that will be next used in the round robin schedule. For e.g. in our case let’s say last server used was server2 so the next server returned for processing our next request will be server3.
UpdateLastServerUsed is used to update the server index in our pool of servers that last processed the request. This method is straightforward.
Next Two methods are SetHealth() and GetHealth() are used to respectively fetch/update the health of our servers. Here I have used a read/write mutex in order to save us from the race conditions as every request to LB is ran in a separate go-routine. If you don’t know what go-routines are understand them as lightweight threads that are handled by the go runtime and 1000’s of go-routines can be mapped on single kernel thread.
Refer this article to understand go-routines better.
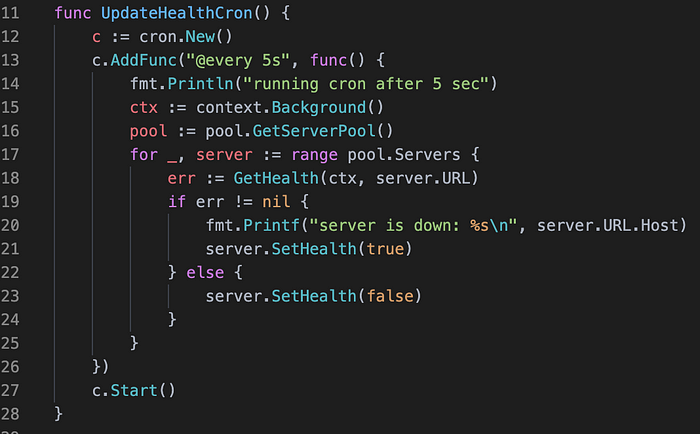
Let’s first see that how we will be updating the health of our servers. In our case I have used passive method to mark the status for our servers. In simpler words basically I have registered a /health GET endpoint on my servers that is used to fetch the health status of our servers at periodic intervals of time. A cron is run after every 5 seconds and ping all my servers to mark them as dead/alive.

Let’s now get into the core algorithm to balance the requests:

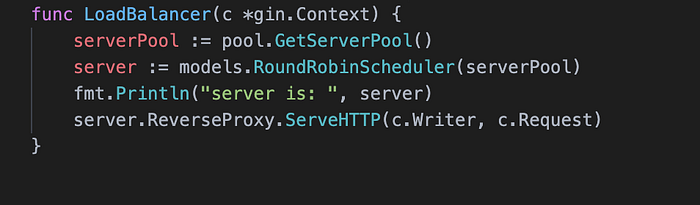
Here we have defined a RoundRobinSchedular method to schedule the requests first we get the server next to the last used server and from that we will keep iterating all the servers until we find a server that is not dead and we will forward that request to that server and will update the last server used of our server pool and that’s how we will keep the load balanced on all the servers. Also note that in case one of our server goes down requests will not be forwarded to that server and when it get’s back up then again it will forwarded some requests.
You can check the full code on my GitHub repository at https://github.com/hbk-007/load-balancer .
DRAWBACKS
Some of the drawbacks in my current implementation. Remember that we are passively marking our servers down/up. What that means is that even when a server goes down it will be still marked as up on our LB unless we mark it down in the next cron function call and hence some of the requests will still be forwarded to that dead server thus resulting in failed responses. We could have handled it better if we have a retry mechanism incorporated i.e. we will send the same request to server no. ‘X’ and if each time the request failed to be served we will mark that server as down. This is actively maintaining the health of a server.
FURTHER SCOPE
We could have added more routing strategies like weighted round robin and measure their performances.
NOTE: I have skipped many details in this article to keep it simple and engaging. You are free to explore more on Load balancers, there are excellent videos on youtube for the same.
If you found this helpful, click the 💚 so more people will see it here on Medium.
